When I first heard about Git and GitHub, I’ll be honest—I was completely overwhelmed. The terminology felt like a foreign language, and I couldn’t understand why I needed yet another tool when I was already juggling so many others. But here’s the thing: once you “get it,” you realize that Git and GitHub aren’t just nice-to-have tools—they’re absolute game-changers that will transform how you work with code.
What Exactly Are Git and GitHub?
Let’s start with the basics, because I wish someone had explained this to me in plain English from the beginning.
Git is like a super-powered “undo” button for your code. Imagine you’re writing a story, and instead of just having one document, you could save every single version of your story as you write it. Not only that, but you could also see exactly what changed between each version, go back to any previous version, and even create alternate storylines that you could later combine. That’s essentially what Git does for your code.
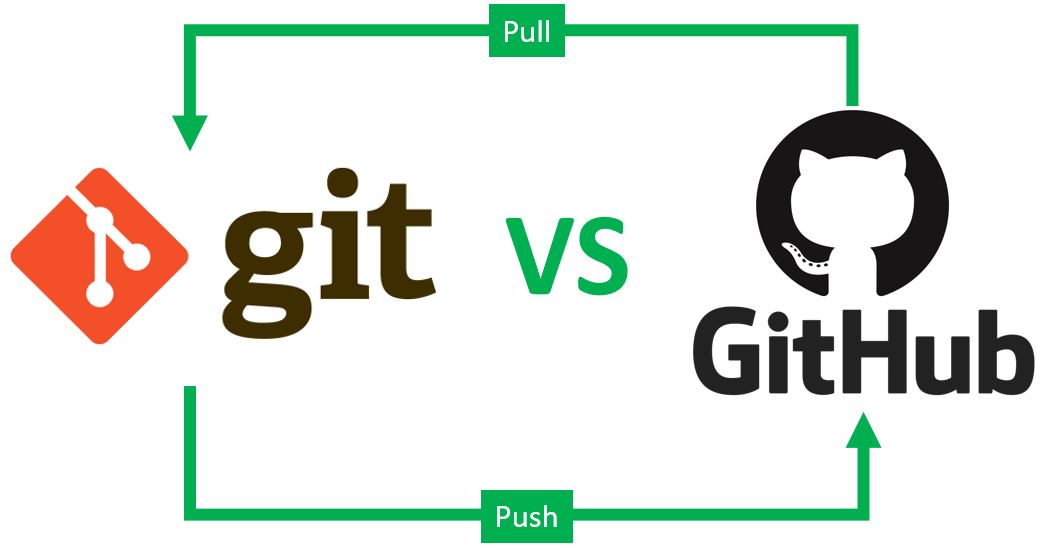
GitHub, on the other hand, is like Google Drive for your Git projects. It’s a place where you can store your code online, share it with others, and collaborate with teammates. While Git works locally on your computer, GitHub lives in the cloud and makes everything social and collaborative.
Think of it this way: Git is the engine, and GitHub is the garage where you park it and show it off to your friends.
Why Should You Care About Version Control?
Before we dive into the how-to, let me tell you why this matters. Version control solves some really painful problems that every developer faces:
The “Oh no, I broke everything” problem: We’ve all been there. You’re working on a feature, everything’s going great, and then suddenly your code stops working. Without version control, you’re stuck trying to remember what you changed. With Git, you can simply go back to the last working version.
The “collaboration nightmare” problem: Have you ever tried to work on a project with someone else by emailing files back and forth? It’s a mess. Git lets multiple people work on the same project without stepping on each other’s toes.
The “what was I thinking?” problem: Six months from now, you’ll look at your code and wonder what you were thinking. Git keeps track of not just what you changed, but why you changed it, thanks to commit messages.
Getting Started: Your First Git Repository
Let’s walk through creating your first Git repository. Don’t worry—I’ll keep this practical and skip the theory for now.
Setting Up Git
First, you’ll need to install Git on your computer. Head to git-scm.com and download it for your operating system. Once installed, open your terminal or command prompt and tell Git who you are:
git config --global user.name "Your Name"
git config --global user.email "your.email@example.com"
Creating Your First Repository
Now, let’s create your first repository. Navigate to a folder where you want to start a new project and run:
git init
Congratulations! You just created your first Git repository. It doesn’t look like much happened, but Git is now quietly watching this folder, ready to track any changes you make.
Making Your First Commit
A commit is like taking a snapshot of your project at a specific point in time. Let’s create a simple file and make our first commit:
- Create a file called
README.mdand add some text to it - Tell Git to track this file:
git add README.md - Create your first commit:
git commit -m "Add README file"
That’s it! You’ve just made your first commit. The -m flag lets you add a message describing what you did.
Understanding the Git Workflow
Here’s where Git starts to make sense. There are three main areas you need to understand:
Working Directory: This is where you actually work on your files. When you edit a file, you’re working in your working directory.
Staging Area: This is like a prep area where you decide which changes you want to include in your next commit. It’s like packing a suitcase—you don’t just throw everything in; you carefully choose what to pack.
Repository: This is where Git stores all your commits. Think of it as your project’s history book.
The typical workflow looks like this:
- Make changes to your files (working directory)
- Stage the changes you want to commit (
git add) - Commit the staged changes (
git commit)
Enter GitHub: Taking Your Code to the Cloud
Now that you understand Git basics, let’s talk about GitHub. GitHub is where the magic of collaboration happens.
Creating a GitHub Repository
- Go to github.com and create an account if you don’t have one
- Click the “+” icon in the top right corner and select “New repository”
- Give your repository a name and description
- Choose whether it should be public or private
- Click “Create repository”
Connecting Your Local Repository to GitHub
GitHub will give you instructions, but here’s the basic process:
git remote add origin https://github.com/yourusername/your-repo-name.git
git branch -M main
git push -u origin main
Now your local repository is connected to GitHub, and your code is backed up in the cloud!
Essential Git Commands You’ll Use Daily
Let me share the commands I use most often. These will cover 90% of your daily Git needs:
git status– Shows what files have changedgit add .– Stages all changed filesgit commit -m "Your message"– Creates a commit with a messagegit push– Sends your commits to GitHubgit pull– Gets the latest changes from GitHubgit log– Shows your commit history
Branching: Your Safety Net
Here’s where Git gets really powerful. Branches let you work on features without affecting your main code. Think of it like creating a copy of your project where you can experiment safely.
git branch feature-login
git checkout feature-login
Now you’re working on a separate branch. You can make changes, commit them, and if everything works out, you can merge this branch back into your main code. If it doesn’t work out, you can just delete the branch and pretend it never happened.
Common Mistakes and How to Avoid Them
Let me save you from some of the mistakes I made when starting out:
Commit messages that don’t make sense: “Fixed stuff” or “Updates” don’t help anyone. Write clear messages like “Add user authentication” or “Fix login button styling.”
Committing too much at once: Don’t wait until you’ve changed 50 files to make a commit. Commit often, with small, focused changes.
Not pulling before pushing: Always run git pull before git push to avoid conflicts.
Working directly on the main branch: Create branches for new features. It’s a good habit that will save you headaches later.
The Power of Collaboration
GitHub isn’t just about storing code—it’s about working with others. Here are some features that make collaboration amazing:
Pull Requests: These let you propose changes to a project. You can discuss the changes, review the code, and make sure everything looks good before merging.
Issues: Use these to track bugs, feature requests, or tasks. It’s like having a built-in project management system.
Forking: This lets you create your own copy of someone else’s project. You can experiment with it, make changes, and even contribute back to the original project.
What’s Next?
You now have the foundation you need to start using Git and GitHub effectively. My advice? Start small. Create a simple project, make regular commits, and push to GitHub. The more you practice, the more natural it becomes.
Don’t worry about mastering every Git command right away. Focus on the basics: add, commit, push, and pull. As you get comfortable, you can explore more advanced features like rebasing, cherry-picking, and complex branching strategies.
Remember, every developer started where you are now. Git has a reputation for being complex, but once you understand the core concepts, it becomes an incredibly powerful tool that you’ll wonder how you ever lived without.
The best part? Once you’re comfortable with Git and GitHub, you’ll find that many other tools and platforms use similar concepts. You’re not just learning version control—you’re learning a way of thinking about code that will serve you throughout your career.
So go ahead, create that first repository. Make some commits. Push to GitHub. Break things and fix them. That’s how you learn, and that’s how you become a better developer.
Ready to dive deeper? Check out the official Git documentation and GitHub’s learning resources. And remember—every expert was once a beginner. You’ve got this!

With over 6 years of experience in the blogging world, I specialize in crafting engaging, informative, and SEO-optimized content across various niches including tech, digital trends, and online monetization. I thrive on staying ahead of industry trends, experimenting with new content strategies, and helping others grow their digital presence.